Friday, July 27, 2012

Quilt Block-of-the-Month #5

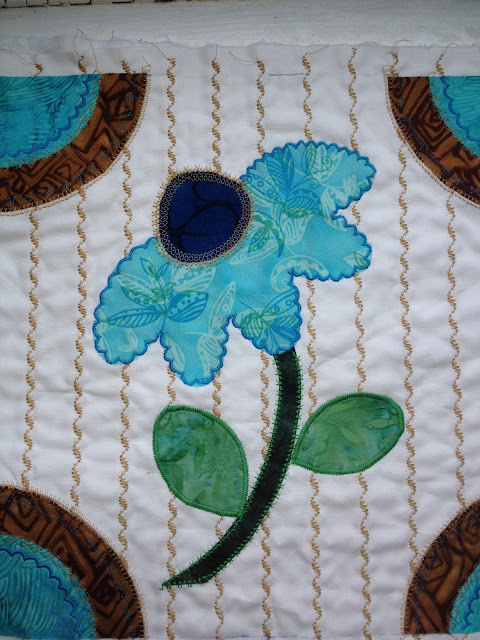
This month, I made two blocks.  They block preparation was different than the blocks I have completed so far.  The background was constructed of two coordinating fabrics cut and arranged in quarters, and then quilted.  The appliqued design was then applied.  Here is the first block.  The pieces are set on the block and I am deciding how to applique it.  You can see the coordinating background fabrics.

After applying the pieces with fusible web, I begin the applique process, creating detail and depth.

There were three new techniques introduced this month; the first one was free-motion quilting.  The quilting in the center of the leaves is an example of free-motion quilting.  "Free-motion" means that you drop the feed teeth on the sewing machine and move the fabric freely in any direction you wish, as you sew.  You use a darning foot for this technique.  It is sort of like "free-hand drawing" with your sewing machine.  I know this looks pretty simple, but it takes a bit of practice to keep the speed of your movement consistent as you continually change directions.  Eventually, the quilt will be quilted through all layers using this technique.


The next technique used on these two blocks, is "couching"; that is applying a decorative cord or trim with a special couching foot and stitch.  This was my first attempt at it, and I simply applied the silk cording around the flower edges, but I could really get creative and think of many ways to use this technique, especially in trimming garments. 
The third technique I learned this month was how to sew buttons with my machine; all you need is the right foot.  The machine is then set to a wide stitch (aligned with the space between the holes in the buttons), and a zero stitch length (so it doesn't feed forward), and watch it sew!  Amazing, eh?  How have I lived without this foot for so long?


Here is the finished block.  Of course, I still need to add the borders.

The second block was prepared and assembled much the same:


Sunday, July 1, 2012

Quilt Block-of-the-Month #4 & #5

No holds barred!  I am ever pushing the boundaries of my comfort zone - and this month I really tried to let loose with color.  Since the last two blocks were "cool" colors, I already knew I wanted to use "warm" colors again, which will lay diagonally opposite. So enough with the chit chat.  Here are the blocks-
I started with these pictures, because they show what the block looks like before the applique work.  It is pretty "simple" and one-dimensional looking.  As the appliqueing begins, detail and dimension begin to emerge.


Two blocks were completed for this month.  Here is the other one;

 Here are the four blocks as they will be arranged in the center of the quilt.  I still need to add the borders.


By the time I was working on the fourth and fifth blocks, I was really enjoying using contrasting colors and every different stitch I could think of.  It certainly creates a lot of visual interest.  I am finally starting to feel like I am "breaking free" from my "box" - my limited, conservative use of color and texture.

Oh, and one more thing...thanks to my little photographer who took all these pictures because she wanted me to blog about this.  I love my Rebecca Pearl!


Sunday, June 24, 2012

Quilt Block-of-the-Month #3

Ah, decisions, decisions!  I think this quilt is more about decisions than about sewing sometimes.  I had wanted to work more "cool" colors into the second quilt block, but somehow, I didn't.  So I thought I would continue that color palette for the third block, since it will be arranged diagonally with the second block.  I seem to have purple on my mind this month.  But at the same time, I must also leave some color options for the other two blocks in this four-block arrangement.

Here is the third block:


Again, it is missing the borders, but I will decide that after next month's blocks are together.  Although the colors seem pretty simple - green and purple- there are really four different fabrics in this block.  But the visual detail mostly comes from the patterns and colors of stitching that were used.

Many different stitches - each with different stitch widths and lengths were practiced, before deciding which ones would look the best.  My Bernina is an old mechanical 1031, so it does not have a lot of stitches the newer computerized machines have.  But I don't care.  I wouldn't trade it for anything.  It is the best machine I have ever sewn on and I am grateful to have it!  Let's just say I have to figure out how to achieve some of the desired "looks" without simply pushing that button on my machine.  The "circular tool" was the newly introduced tool this month.  The corners of this block were cut from a circle which was first embroidered with this tool.  I was unable to use one for my older machine, so I had to make do without it.  But that is okay.  It gave me the opportunity to really use my skills and a little ingenuity to achieve the same look without it.


Btw, the owner of the Bernina store was looking at my machine while I was at class this month and said this was the machine that he just can't keep in the store.  It was only made for one year, so there aren't many of them.  He said whenever he gets one in on a trade, it is gone the same day!


Sunday, June 17, 2012

Quilt Block-of-the-Month #2


Meet Bernina foot #34 - the clear open-toe foot.  It is used for different types of applique work because you can see through it and control precisely where the needle stitches.  Precision is extremely important for keeping a stitch pattern perfectly aligned on the edge of the fabric.  This is the foot I got this month.

The quilt block I made for month #2:


This is one of four blocks that will make up the center of the quilt and will share an inner border.  I still need to add the border, but didn't want to pick those fabrics until I completed all four blocks.  I decided to use "cool" colors on this block and the next, since I used "warm" colors on the first block.  I'm not sure I like the background quilting stitch I selected for this, but hey, I am trying to get outside of my "comfort zone" and try new things.

Sunday, June 10, 2012

Quilt Block-of-the-Month

For the past few months, I have been working on a "Block-of-the-Month" quilt.  I have always wanted to make one of these, but could never find the time.  Recently, I had a machine cleaned at my local Bernina store, and saw a picture of this quilt.  I stared at it for several minutes.  I really liked it.  I really, REALLY liked it.  It is called "A Garden of Stitches".  "Hmm...I think I just might be able to make the time to do this one," I thought.  So I signed up for it on the spot.  I paid for the whole thing right then and there.  Once I decide to do something, I'm all in, lol.  One thing I especially liked about this pattern is that each block incorporated a different technique, whether it be a specialized foot, type of stitching, etc.  I also wanted to learn how to use some of the newest products used in quilting, that I have never used before.  All in all, I was looking forward to learning how to use my machine to its potential, and end up with a beautiful new quilt for my bed in the end.

Here is the first block.


Unlike pieced quilts, where you select medium, light and dark fabrics for specific parts of the pattern and layout, this pattern required selecting many, many different fabrics.  This seemed overwhelming at first.  It is not easy to "picture" what your entire quilt will look like when you are selecting fabrics, colors and patterns a block at a time.  There are no repeats in this quilt.

Ultimately, I decided to incorporate as many colors as possible, and use brown in all the borders to "unify and neutralize" all the blocks.  Every block begins with a 14 inch square of ivory cotton.  Next, it is layered with quilt batting and the background pattern is quilted.  Every block will have a unique pattern for its background.  Again, I decided to use a "coffee" colored thread on every block for continuity.

I think you make a hundred decisions for every block you quilt; what pattern, stitch length and width to quilt the background, what color, texture and patterns of fabrics to use, what applique stitches you will use for each piece of the pattern, and what colors will produce the desired affect, as well as what border colors, patterns and textures will work, not only for that block, but will eventually look good with the adjacent blocks, and ultimately, in the quilt as a whole.

This first block utilized the "walking foot".  This foot is expensive, but amazing!  It feeds layers of fabric evenly and perfectly aligned.  No bunching, pinching or slipping!  I have always wanted one, and finally decided to buy it for this quilt.  I am totally hooked on it.  I will use it for every block and for many more projects thereafter.  I also experimented with several new stitches for applique, which I have never before used. 

Friday, March 16, 2012

Friday With Friends!

Tonight, we had some friends over for dinner! We normally spend Fridays at AWANA, but it was spring break, so we invited the intern pastor of the church Edmond, and his friend Jason, for dinner! We had a great time of food and fellowship! We made paella, a shrimp and sausage dish, with a delicious fruit salad and dinner rolls! It was so yummy! And of course, we had to have dessert, so we made chocolate cupcakes with chocolate frosting!  We all had such a great time!

From left to right: Jason, Edmond, Rebecca, Lori, Hannah and Eric

Tuesday, February 21, 2012

From Rags to Riches - Literally!


Each year, my family attends an Historical Ball in Greenville, NC.  Everyone comes in costumes dating from the Middle Ages through World War II.  Our family has enjoyed this event for the past two years.  I was in need of a costume for the ball.  My daughters all had the big "Civil War" style gowns with hoop skirts, and I made my husband a very authentic navy wool Union soldier uniform last year.  My friend Allison mentioned that she had some left over silk from a job she did some months ago, and asked me if I wanted it.  It was beautiful, embroidered 100% silk - about $300 per yard.  And she had just enough enough for me to make a fancy ball gown.  So I brought the silk home with me and literally turned these "scraps" into a ball gown.